Tag: requirements

  • What is a Wireframe?

    What is a Wireframe?

    A wireframe is a drawing of a screen as it might appear on a website, an online platform or a mobile app. Wireframes are very powerful tools for describing what you want to build, and for illustrating your idea. In this article, I’ll explain the different types of wireframes and how you can use them to create your platform or app.

    On the web and on mobile apps, screen design plays a key role in how your customer and users interact with your product. These designs are usually created by user experience (UX) designers; often with the input of graphic designers (some user experience designers have visual design skills as well).

    Wireframes in Product and Software Development

    Traditionally, screens would have been envisaged in the “design” phase of the development process. Developers and designers would sit together to determine how a user will move through the application, and what the screens should look like.  However, screens can play a vital role in explaining what a product should do. As a result, screen designs are edging their way into earlier phases of the software and product development processes.

    As you’re validating your idea during the “analyse” phase of product development, wireframes can used to test your product idea. You show the screens to potential customers so they can understand what you’re trying to do and what the product might look like. The screens can even be linked together so people can ‘navigate’ through a particular feature. The feedback is invaluable in terms of seeing how people interact with your idea.  You can also get their reaction to your solution and whether it solves their problem.

    In terms of defining your product (the “define” phase of product development and the “requirements” phase of software development), wireframes are a great way to illustrate to developers what you want your product to do. In some cases, people get UX designers involved here to get some detailed wireframes outlined before starting development. However, be aware that there’s often a strong dependency between what the screen looks like versus how things work behind the scenes. In some cases, the designed screens may have some technical constraints, so you might have to re-do some of the screens at a later date.

    Types of Wireframes

    Wireframes come in different levels of detail and each one of them has different uses when creating your product:

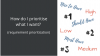
    1. Low-fidelity wireframes

    These wireframes are hand-drawn and very high-level. They show the overall placement of content on the screen using boxes to represent areas of content, and lines to represent text. These are often used to map out what screens are required, the flow of the screens and the high-level content (e.g. picture, text, button, menu bar, etc). The idea is that you don’t want to spend too much on the detail. You’ll use these “lo-fi” wireframes in the “analyse” and “define” phases as you’re just illustrating concepts.

    2. Medium-fidelity wireframes

    Lo-fi wireframes are converted into computerised images with software tools like Sketch or Balsamiq or even basic drawing tools like PowerPoint. The high-level content is replaced with additional details – such as what type of picture will be displayed, what content will be included (e.g. contact information, user registration), etc.

    3. High-fidelity wireframes

    High-fidelity (“hi-fi”) wireframes often look like graphical representations of the actual screens. User experience designers will provide actual fields on a form (e.g. field labels, field types – calendar, drop downs, radio buttons, etc), general spacing and navigation. Graphical or visual designers will fill in the pictures, colours, font types, logos, styling etc. Items on the screen are annotated to include design and development notes (e.g. click here to go to the home page).

    The diagram below shows the level of detail in different types of wireframes:

    In many cases, people don’t bother with hand-drawing screens, go straight to the computer, and call them lo-fi wireframes. Some people will skip that step altogether, and go straight to hi-fi wireframes. It doesn’t really matter what you do – it’s more a matter of how much time and money you want to spend on it. It’s much quicker to hand-draw something rather than to put it on a computer. If you end up with multiple iterations of your screens or end up with new screens altogether, you spend less time and money doing this when you’re drawing boxes and lines versus very detailed screens.

    It’s important to remember that during “analyse” and “define/requirements” activities, wireframes should be focused on “what” rather than “how”. You don’t want to restrict your developers by telling them “how” you want something done.  Wireframes should be used to show them “what” people should be able to do, and the outcomes or benefits they expect from using your product.

    Why should you care?

    Depending on your budget and skills, you need to determine whether you want to create your wireframes or get someone to do it for you. You may want to draw low- or even medium- fidelity wireframes, and then pass them on to a designer. Alternatively, you may decide that your strengths lie elsewhere, and you hire a designer to do the wireframes from scratch. If it’s the latter, then you’ll still need to provide some guidelines to your designers, and this can be done in your product definition.  This instructs the designer on what the product should do.

    Either way, knowing how to draw wireframes, and understanding the different levels of detail are important skills to have. Pictures are a very powerful communication tool, and can be used throughout the development process to show developers what you want them to do.

    Are you ready to turn your good idea into a great product?
    My idea to launch checklist is your plain-English guide to getting there.

    It’s available now for only $24.
  • Get from “idea to launch” with my new checklist!

    Get from “idea to launch” with my new checklist!

    If you’ve got a great idea for an online platform or mobile app, but you’re not sure where to start – you’re not alone. Tech can be intimidating for those that have never had any experience with it before. Sometimes you want someone to guide you through the process – but you just can’t afford to hire someone to help you.

    The good news is that building an online platform or mobile app is a process.  This means there are clearly defined activities that you can follow to reach your end goal. Once you know this, the whole thing becomes more manageable – you just have to take it one step at a time.      

    Introducing the idea to launch checklist

    Today, I’m pleased to introduce the “idea to launch checklist”. This downloadable checklist contains “must-know” tasks in 15 core areas, so you can turn your good idea into a great product. It provides a plain-English roadmap for your journey. You’ll see the main activities for developing a product, and the tasks involved in each step.

    The idea to launch checklist came about as a way to take non-technical people through the creation of a digital product. Like the design and manufacturing of any product or service, platforms and apps have their own brand of jargon and their own unique complexities.  This checklist needed to be written in a way that anyone could follow.

    I understand that not everyone wants to be an expert in software development. Business owners and working professionals certainly have enough things to do and learn! This checklist has been designed with you in mind. If you’re serious about building your own digital product, then the information in this foundational checklist is definitely in the “need to know” bucket. 

    Did you know that on average only 16.2% of software projects are completed on-time, on-budget and with the features and functions originally requested?

    Having worked on technology projects for almost 20 years, I’ve learnt a lot about software development – to a point where it’s mostly routine and I don’t have to think about what to do. Throw in 8+ years in product management, and there’s all of this experience that I took for granted.

    It made me realise that this lack of knowledge is costing people money.  I’m sure people would learn a lot from their experience, but I think they would prefer not to spend so much money on those lessons!

    As someone that’s been doing this for so many years, I really want to help people avoid this situation. So, I’m sharing my experiences and knowledge with people that have had their “light-bulb” idea, and are ready to do something about it.

    Here’s a taste of what you can expect from my checklist:

    • 21 ways to evaluate your idea. Let’s be real – you need to know if you’re backing the right horse.
    • 20 critical steps to finding the perfect developer. This is not the time for speed dating.  A bad decision will cost you time and money and could even delay your product going to market.
    • Plus 25 tasks that will ensure your product testing is rigorous and effective…. If you’re really going to do this, you want to do it right.

    Think about it – you can’t ride a bike the first time you try it. In fact, before you perfected riding on two-wheels, there’s a good chance you rode a tricycle or had training wheels. You also probably fell a few times.  Maybe you could only make it to the end of the driveway before putting your foot down. Eventually though, you made it to the end of the block and around the park a few times.  

    Building digital products is much the same as this. That’s just the way life is. It often takes a few goes around the block before you’re comfortable with what needs to be done. You can try it with two-wheels for the first time without the training wheels, or you can get some help to make it easier on yourself.

    This foundational checklist is all about action. I want to see you get that platform or app built, and I want you to get there in a straight-line path. So, if you’re ready to build your platform or app, click here to find out more.

  • How do I prioritise what I want? (requirement prioritisation)

    How do I prioritise what I want? (requirement prioritisation)

    Prioritisation is probably a concept that you’re familiar with – you take a list of things and figure out which ones are more important than the other ones. Sounds simple enough?!

    When you’re building an online web platform or mobile app, prioritisation comes up all of the time! In this article, I’ll look at prioritisation as it relates to defining what you want your product to do. This notion of requirement prioritisation is a difficult one to grasp – because everything is important!  I’m going to take you through this process and share some tips for prioritising what you want.

    What are you prioritising?

    Requirements describe what you want your product to do. Requirements range from high-level statements (e.g. The user will be able to create an account) to detailed statements (e.g. The user will be able to create an account with their first name, an email address and a password). Every requirement needs a priority so you know how important it is.  

    Prioritisation methods

    There are really two main prioritisation methods:

    1. Low/Medium/High or Must Have/Should Have/Nice to Have; and
    2. Ranking

    Let’s look at each of these in a bit more detail:

    1. Low/Medium/High or Must Have/Should Have/Nice to Have

    This is a simple categorisation of your requirements based on the following criteria:

    1. High/Must Have: These are the things that have to be there in order to launch your product. They are critical to the success of your product. If these things don’t work, you have to delay your launch until things are fixed.
    2. Medium/Should Have: These are the things that “should” be there for the launch of your product, but don’t stop the launch from going ahead if they’re not built or not working properly.
    3. Low/Nice to Have: These are the extra things that you’d like your product to do, but they’re not all that important to your product right now.

    All of your requirements are given one of these priorities. Initially, your product will be focused on the “high priority” requirements, and if there’s time and money, the “medium priority” requirements can be included. Generally, your “low priority” requirements will be built after your initial launch.  

    2. Ranking

    Ranking is a straight-forward list that starts from 1 (the most important) and increases sequentially from there. It dictates the importance of one requirement relative to all other requirements. This is the method used in the Agile methodology to manage the list of things to be built. You start with 1, and keep going down the list until you reach your last requirement. You’ll have to decide which of the requirements on your list need to be included in your initial launch, and then you’ll continually develop your product after that.  As new requirements are discovered, these need to be slotted into the list based on their priority.

    How do you decide the priority?

    So, how do you decide if something is a “must have”? Which requirement is #1?

    There are several things to consider. Requirements are important if it’s:

    1. Critical to solving the main problem/need/goal you’re trying to address
    2. A legal, regulatory, or security requirement
    3. Needed for a satisfactory user experience
    4. Inclusion will help you to achieve your goals
    5. Driven by potential customer and user feedback

    The key is to be as objective as possible in setting your priorities. You may even have to test how important a requirement is by talking to potential customers and users. Prioritisation should be an informed business decision. Make sure you take the emotion out of it. You can’t make everything a “must have” – otherwise, you’ll never launch!

    Why is prioritisation important?

    You’ve prioritised all of your requirements, so how does this help you build your platform or app?

    Prioritisation comes into play when you’re deciding how much you want to build. Unless you’ve got all of the time and money in the world, you need to make decisions about what to include in your development project. If you’ve prioritised your requirements objectively, you start with your highest priority requirements first. Most people are constrained by their budgets, so prioritisation forces you to decide if you really need something or not.    

    Prioritisation also becomes a consistent and easy way to make decisions about your development project, and to communicate the importance of each requirement to your team. If a high-priority feature is taking longer than it should to build, or if there are issues with it during testing, then everyone knows what they should be working on.

    Prioritisation is ongoing

    After you’ve launched, you continue to add new features and functions to your product, and you’re going to have to decide what to build next. You should continue to prioritise these requirements, so that you can make objective decisions about the improvements you make to your platform or app. This will ensure that you’re spending your money on the right things – and that’s critical for your product’s success.

    Want to learn more about building and growing your platform or app? Join our email list to receive regular updates

    Just curious
    Evaluating my idea
    Ready to start building
    Building my product
    Launched my product

    * When you sign up for our list, we’ll send you emails that include news and updates, occasional offers and promotions, and exclusive content and resources to help you on your development journey. We will not spam you. If you don’t wish to hear from us anymore, simply select the unsubscribe option at the bottom of any email that we send to you. To view our privacy policy, click here.

  • What’s scope creep?

    What’s scope creep?

    The term “scope creep” might conjure up images of spiders and other crawling insects, but it’s actually a real concept in software development. I introduced it in my article on “Tips for Building a Web Platform or Mobile App”, and now I’m going to expand on it to tell you why you need to be aware of it and how you can prevent it.

    Scope creep occurs when the size of a project increases after it has started due to the improper management of requirement changes.

    Huh?!

    Ok – say you have a project that starts with a list of 10 things to build. That’s the scope of your project. As you go through the project, you realise that there are another 5 things that you want to build. If you decide to include them in your project, your scope has grown by 50% to 15 things. That’s scope creep.    

    Why do you need to know about scope creep?

    Scope creep is an easy trap to fall into. When you’re building a product from scratch, there’s only so much that you know at the beginning. As you start the design and build process, you learn more about your product, and you think of more things you want your product to do. You want it to be perfect, so of course, you need to include it in the initial version of your product. The new requirement is added to your project – then another, and another – and all of a sudden, it takes months longer to finish the build of your product and costs you more.

    Your developers will love you! They get more money and you get the product that you want.

    So why is this bad?!

    Presumably, when you were planning to build your platform or app, you had a budget of some sort – the amount that you wanted to spend or could spend on development. Better still, you had an idea of the financials required to make your idea commercially viable (e.g. the numbers that you needed to hit to make money). If you fall into the scope creep trap, you might a) not have enough money to complete the building of your platform or app and b) your idea may no longer be commercially viable.

    This notion of scope creep also ties into my article the other week about a minimal viable product (MVP). People often have good intentions and start with building an MVP – and then they get excited – a competitor has this feature that you just have to include, and there’s this really cool feature that you think your users will love. Your initial release gets bigger and bigger, and is no longer an MVP. Also remember, that 80% of features in most applications don’t get used! There’s a good bet that many of your unplanned changes won’t materially affect your product in a positive way.

    What can you do to prevent scope creep?

    There are two main ways that you can prevent scope creep from happening.

    1. Define your product properly upfront
    2. Manage change to your product scope appropriately

    1. Define your product properly upfront

    Scope grows when you realise that there’s something else that needs to be included in your project. So, to prevent this from happening, you need to have a better idea of what you want to build upfront. This involves having a very clear, and often detailed, view of what you want your product to do. Take the time to think through every process and every function that defines your product.  You want to make sure you’ve captured different scenarios that might occur, and the features you want your product to have. This will allow you to have a well-defined scope for your project.

    The reality is that there’s going to be things that you miss – and that’s ok, because now you’re only going to miss a few things rather than lots of things. This is where the second method for dealing with scope creep comes in.

    2. Manage change to your project scope appropriately

    When you discover that there’s something else you need to add or change you to your product, then there’s a few things that you should do before you decide to actually build it:

    1. Prioritise the change: How important is it really? Do you need it in the first version or can it be something that’s added shortly after?  

    2. Get your developers to estimate the size and impact: Understand how much it will cost you to make the change, and how it will affect the overall project schedule.

     3. Evaluate the impact to your financials and business model: Use the numbers to see if you can afford to make the change. Does it affect the commercial viability of your product? Will delays disrupt your launch strategy? Do the benefits outweigh the costs?

    If you do all of this and decide the change is worth it, then go ahead and do it. This doesn’t have to be an extensive, drawn-out process. The point is that you’ve made an educated decision about changing the scope of your project.

    If you’re working under an agile methodology, recognise that your change may mean that something else doesn’t get done. This change may have a higher priority and cause another requirement to be pushed back. You’ve got to decide whether to extend your project to include the lower priority requirement or not.

    Not all change is bad…

    Despite all of this doom and gloom about scope creep, there are often very legitimate reasons for making changes to your project. The lesson here is that you don’t want to be caught unaware of what’s happening. It’s very easy to for a lot of small changes to accumulate and drive your costs up and delay your launch. So, before your start your project, be as sure of your can of what you want your product to do, and while you’re product is being developed, have a process in place so that you can make informed decisions about changes that you want to make to your product.

    Want to learn more about building and growing your platform or app? Join our email list to receive regular updates

    Just curious
    Evaluating my idea
    Ready to start building
    Building my product
    Launched my product

    * When you sign up for our list, we’ll send you emails that include news and updates, occasional offers and promotions, and exclusive content and resources to help you on your development journey. We will not spam you. If you don’t wish to hear from us anymore, simply select the unsubscribe option at the bottom of any email that we send to you. To view our privacy policy, click here.

  • What’s a minimal viable product? (and why start small)

    What’s a minimal viable product? (and why start small)

    A minimal viable product (MVP) is the smallest possible thing that you can build to tackle a core need, problem or goal that your product is trying to address. Other definitions include something that delivers customer value or something that allows you to learn more about your customers. In fact, an MVP is probably a mix of all of these things.

    Sounds simple enough? However, these definitions can result in confusion about what practically constitutes an MVP. The key message though is that it shouldn’t be the end product that you envision and it can’t be so basic that it doesn’t do anything.

    Why start with an MVP?

    An MVP is a good way to validate what your customers and users really want. They have something tangible to see and play with, and then you can get feedback on what’s good or bad and what else needs to be there. You solve their core problem or need, so you make them happy.

    Did you know that research shows that 80% of features in custom applications are not used? Imagine spending a whole ton of money on functions that just sit there untouched? What a waste of your precious time and money!

    If you’re constrained by time or money, then an MVP allows you to build something that can give you a foothold for you to grow from.

    “My competitors do ‘xyz’. My product needs to as well.”

    It’s so tempting to look at what your competitors are doing, and want to replicate it in order to attract customers and users. I totally get it! Remember though that your competitors probably didn’t have all of that to start.

    It comes back to your strategic competitive advantage and your value proposition. If the core of what your product is trying to address is included in the MVP, and even if this is only slightly better than your competitors, then you’re already ahead of the game.

    If the market is so mature that you need all of those features to launch, then I predict a tough ride ahead. Remember that your competitors may have deeper pockets than you, so if you release a new feature, they’ll likely copy it. You don’t want to go down that rabbit hole! Ultimately, you probably will need to build all of those features, but not for your MVP.

    “My customers or users are going to expect more. “

    In the world of software and product development, the word “launch” is actually a bit of a fluid term. At the point of releasing any new product, you’re at the introduction stage of the product lifecycle. You’re not dealing with thousands of users or customers.

    You want a core group that are going to sing your praises and get you the momentum you need to grow. This group of early adopters understands that your product is evolving and they want to be one the journey. At this stage, you have the opportunity and time to add the extra features that you need. Then, when you’re ready, you can put all of your marketing efforts into getting all of those customers and users, so you can hit the “growth” stage of your product.

    Why go even smaller?

    All of the above is said with my product manager hat on. Now, I’m going to talk about it from a software development perspective.

    Here’s the thing, if you’ve never built a platform or app, then you’re dealing with a lot of unknowns. This means that there are a lot of things that can go wrong. When things go wrong, it costs you time and money. You want to do everything you can to mitigate that risk.

    So, in the process of building your MVP, why not start even smaller? Start your development experience by building a small part of your MVP. Get it done – whacked out in a couple of weeks and all of a sudden you’ve got a product. A very rudimentary and non-commercial thing – but it works. All of a sudden, you’ve completed something that you’ve never done before.

    This is very important. In this experience of creating the first part of your product, you’ve also learned how software development really works. It’ll now be a lot easier to add to what you have built. Having a project to build all of the bells and whistles carries a lot more risk, than building something small and then continually adding to it. Something finished within two week or a month is way less risky than something that takes three months to build. Starting small also gives you a chance to test out your developer. If you’re not happy with how it all went, you can kick them to the curb with minimal impact.

    When you’ve built enough stuff to have an MVP, you can then “launch” it to your early adopters. In fact, why not try and get some of them involved even earlier? They can help you to prioritise what should be added to your product and they’ll be invested in its success.

    What next?

    At the end of the day, building an MVP is just one strategy for product development – albeit a very popular one right now. It’s not a blanket “must do”. Like anything, there are going to be exceptions to this. There are other strategies for building new products that you can choose from – people have been following them for years with success.  

    As you take your platform or app idea to the next step, think about your approach for building it for its first release. How much do you really need it all on launch? How much risk is involved? Would you be better off starting small and continually enhancing your product until it’s ready for your big launch?  Remember, sometimes it’s worth going with small in order to grow big.

    Are you ready to turn your good idea into a great product?
    My idea to launch checklist is your plain-English guide to getting there.

    It’s available now for only $24.
  • Customers vs users (what’s the difference and why do I care?)

    Customers vs users (what’s the difference and why do I care?)

    Do you know the difference between “customers” and “users”? When I was creating my requirements writing course, these terms created some confusion with the person editing my content. It got me thinking that not everyone knows the difference. So, I’ve written this article to shed some light on a concept that is actually pretty important when you’re defining your product.

    In this picture, I’ve summarised the relationship between customers and users and I’ll discuss each of these below. 

    Customers

    A customer is the person or entity that will be giving you money. Note that I didn’t say – “giving you money for your platform or app”. This is because you may actually make money from someone that will never access your web platform or mobile app!

    There are many ways to make money from an app. The most common is someone paying money to access the app or to access special features within your app. These are your direct customers. So, if you have a web platform that charges $99 a month, the person signing up to your app will be your customer.

    If you make money from selling advertising space, then your customer is not the person that signed up to your app. It’s now the people or companies that are advertising with you or the ad network you subscribe to. If you sell the analytics from your app, then your customers are the people or companies buying that information. These are your indirect customers.

    You may have more than one customer. If you’re creating a 2-sided marketplace of buyers and sellers and the sellers have to pay you a commission, then the seller is your customer. If you then put advertising on your website, then the people advertising on your site will also be customers.

    Users

    The users of your app cover a lot more ground than your customer. Users will be accessing your app for a specific purpose – and it may not be for obvious reasons. As mentioned above, your customers may or may not be one of your users.

    When you’re starting out with defining your product, create a list of users for your app. Let’s start with the people that will be primary users – the ones that will sign up for your app or download it onto their phone. Then there are users that are invited by your primary users to interact with your app. If you’ve got an invitation platform, then these are the people that receive an invitation. If you’ve got a fundraising platform or event ticketing platform, then your users will also be those that give money to the primary user. These are secondary users – whose experience with your platform is just as important as the primary users.

    Next, there are users that will be needed to run your app – the people that work behind the scenes. These are your operational users. There’s a good chance there will be some admin involved – people to manage the users, people to create reports, create/update content on the app, etc. There’s also going to be support people who will answer questions from your users and help them solve any problems they might have in the platform.  

    The next level of users includes people that are managing the business end of your app (e.g. management users). Here you may have to be a bit more creative. If you’re primarily doing this on your own, then you’re going to be wearing lots of hats. You need to put on those different hats and think about what you might need the application to do so that you manage your business.

    For example, as the owner, there’s a lot of reporting that you’ll want to look at to determine what improvements to make and how profitable your app is. You’ll also be in charge of the security of your user’s personal information, so there are security concerns. Have customers or users in the EU? What do you need to support GDPR? If you’re selling advertising space, then you need information on how users interact with your platform. As a marketer, you’ll want user information that you can use to get new customers, retain existing customers or increase the spending of existing customers. Your accountant will want sales information.      

    As you can see, your list of users might actually start to get a bit long. Of course, not all users are created equal in terms of their importance in your app. However, being aware of them will help you to define a better product.

    Why do you need to know this?

    Your app should be driven by the needs and problems of your users. So, if you don’t know who your users are, then you won’t be able to define your product. In my last post on defining your product, I discussed how the users of the app should drive your requirements (e.g. “As a [user]…”). Knowing who your users are and knowing what they need from the app, will make it a lot easier to create a complete product.

     Your customers are just as important. Even though they might not use your app. You have to create a product that is worth them spending money on. So, understanding their goals and objectives will help you to include the features, functions and data in your product that your customers need as well.    


    Want some help to define your customers and users? Send us your details and we’ll set you up with 30-minute discovery session to get you on the right track:


    * When you sign up for a discovery session, we’ll also add you to our mailing list so you can receive emails from us (with your consent). These emails will include news and updates, occasional offers and promotions, and exclusive content and resources to help you on your development journey. You may also receive follow-up emails in relation to this session. We will not spam you. If you don’t wish to hear from us anymore, simply select the unsubscribe option at the bottom of any email that we send to you.To view our privacy policy, click here.

  • An intro to defining your product (aka writing requirements)

    An intro to defining your product (aka writing requirements)

    In my last post, I talked about how people often have trouble briefing their developers and specifying what they want their app to do. This week, I thought I’d share the basics of defining your web platform or mobile app. In “biz” speak, this is really your product definition and in “tech” speak, these are called “business requirements” and they represent a documented version of your product and what you want a developer to build.

    Defining your product (aka writing requirements) for apps is actually a skill. It takes practice to think about what your product should do and how to explain it to someone. You need to translate your high-level idea into something concrete and tangible so that it instructs a developer on what you want.  

    As the person that has the idea and the person that owns the business, you’re going to need to know your product inside and out. I’ve found that this is often a hard thing for newcomers, as they don’t know to drill down to that next level of detail.  

    There are a few steps to creating a full set of requirements for your product, which will take a while to explain (I’ve identified eight of them in my requirements writing course). So in this post, I’m going to jump straight the end to show you what a requirements looks like. This is what you want to get to.

    Need help with defining the requirements for your web or mobile app? Fill in the form below for a free 30-minute discovery call:

    High-Level Requirements

    If offering a solution (your app) to a person is all about solving their problems or helping them to achieve their goals (more on this another time), then when you define your product, you need to focus on three things:

    1. What is it that you want someone to do?
    2. Who is going to be doing this “thing”?
    3. Why will they want to do it?

    A “user story” is a handy way of pulling this all together in a single sentence:

    As a [user], I want to be able to [perform a task], so that I can [obtain some benefit]

    This amazing sentence is called a “high-level requirement”. It’s giving the reader an overview of a specific thing (or “function”) that needs to be supported in your app.

    Seems simple right?! Well, here’s where it gets a bit complicated. Your user story could include a very big activity – in which case, you’ll want to break your user story down into a bunch of little user stories. For example, imagine you were building a travel-booking website, one of your user stories might be:

    As a manager, I want to be able to view reports, so that I can manage my business.

    This user story covers quite a lot of ground – what reports do you want to view? What do you need to manage in your business? From this user story, you might actually create some other, more detailed, user stories:

    As a manager, I want to be able to view a booking report by property, so that I can see how many rooms have been booked for a property and make decisions about pricing.
    As a manager, I want to be able to view a report on total revenue by property, so that I can identify low performing properties to investigate.

    Can you notice the difference between the first user story and the next two? Look at how specific the second two are. Writing requirements this way forces you to be as descriptive as possible and also to think about what you really want.

    The important thing here is to make sure you’ve covered the whole breadth of what you want your product to do. If you miss something here, it may end up costing you more money, as what you ask the developer to do all of a sudden becomes a lot larger.

    As I mentioned in my tips article the other week, try and keep your product as small as possible. This will reduce the complexity in your project and ultimately the cost and time it takes to build. It’s always easier to improve on something that has already been built.

    And there’s more!

    Your requirements aren’t done yet! From your high-level requirement, you need to break it down even further into detailed requirements. This means that you need to provide a bit more information about it. The kinds of things that you need to consider are:

    • What data do you want to capture, store or retrieve?
    • How will users complete a particular tasks?
    • What are your users trying to accomplish? 
    • Are there different scenarios that might occur as a task is being performed?
    • What are some of the assumptions, prerequisites and dependencies that apply to the task?
    • Are there different rules that should be applied by the app?
    • Will there be things that you might want the app to do in the future?

     If you take our reporting examples, some of the detail might include the fields that you want to see on the report. Other things that you might consider are:

    • How do you want the data to be sorted?
    • Do you want to be able to filter the data? (e.g. by type of room? by date range?)
    • Do you want to see an average price across all bookings? Maybe by room type?
    • What other information do you want to see? (e.g. how many rooms have not been sold?)

    In addition to the user story above, the detailed requirement for the booking report by property might also say:

    The report should include a list of all properties available on the site.

    It should include the following fields: country, city, property name, property address, booking date, total rooms allocated by rate and by type, total rooms booked by rate and by type, and total rooms not booked by rate and by type.

    The data should be sorted by country.

    The user should be able to filter the report by country and by city.

    These are the kinds of things that you’ll want to think about and document. You have to do this for every high-level requirement that you have, so there will be a lot to do!

    The key is to get you really thinking about what you want. Don’t worry about getting all the detail down in the first pass. There’s a good chance that as you write one requirement, you’ll remember something for another requirement. You may create, combine or delete high-level requirements as you flush out the detailed ones. In the whole process of defining your product, you’ll probably go back and forth several times until you feel like you’ve got it all sussed out. You want your requirements to be as complete as they can be, but chances are you’ll miss some of the details. That’s ok too as your developers should pick them up when they review your requirements.  

    And there’s more!

    As you can see, it takes quite a lot of work to define your product. Even if your app will only have one or two functions, you still need to have a detailed understanding of what you want your product to do. As the person that owns the idea, people will look to you for guidance. The clearer that you can be about your product, the easier it will be to develop your app.

     So, to summarise – in order to define your product, you have to write both high-level and detailed requirements for each of the things that you want your app to do. These requirements will inform your developers on what you want to build. It’s important for you to have a detailed view of your product to ensure its success.  

    There are some more tips on writing requirements in my article the other week, so if you haven’t read that one, head over there now to check it out.

    Help! I need to discuss strategies for defining my product! Fill in the form below for a free 30-minute discovery call:

    NOTE: for those of you that understand what agile is, I understand that some of the detail would normally get flushed out during a sprint. However, I feel that people new to building apps should take the time to write detailed requirements upfront so that they can better understanding what their product will do and so that they can appreciate all of the decisions that need to be made to build it.    


    * When you sign up for a discovery session, we’ll also add you to our mailing list so you can receive emails from us (with your consent). These emails will include news and updates, occasional offers and promotions, and exclusive content and resources to help you on your development journey. You may also receive follow-up emails in relation to this session. We will not spam you. If you don’t wish to hear from us anymore, simply select the unsubscribe option at the bottom of any email that we send to you.To view our privacy policy, click here.

  • Telling a developer what you want your app to do (challenges and strategies)

    Telling a developer what you want your app to do (challenges and strategies)

    A common challenge of non-technical people building web platforms or mobile apps is that they struggle with how to tell a developer what they want. Defining your product is part of the requirements writing activities in the software development process and it’s an important part of building your app.

    Imagine you describe a feature to your developer and when it’s ready, it doesn’t do what you want it to.  Sound familiar? It’s actually not uncommon for this to happen. So, in this article, I’ll explore why this is the case and provide some strategies for overcoming it.

    A different skill…

    Explaining and describing things is a skill and so is writing. These are skills that we all have – most people have written an email or told a story. However, it can be a lot harder when you’re trying to articulate what you want your product to do.

    Imagine you want to buy a house and you’ve engaged a real estate agent to find you one. When asked what you want, you might say that you want to live in a particular area and you might mention the number of bedrooms and bathrooms that you’re looking for and may be a price range. The agent finds you a bunch of houses and you go and look at them. You then realise that you forgot to mention that you want a single-storey house and that it should be detached and have a pool and a lockup garage, etc. The real estate agent comes back with another list of properties – and you realise again that there are some more things that you want.

     This example illustrates what happens in app development projects all of the time! People are constantly adding to their list of “wants” and all of a sudden, the project takes longer and costs more than you anticipated.

    Have you also noticed that we very rarely talk about what we want in life at a detailed level? When we’re asked to do it, it can take us a while to come up with a really good answer. It takes even longer if we’re asked why we want what we want. When we’re documenting what we want our product to do, we’re doing just this – and if we haven’t practiced this skill, then it takes a lot more time and effort to do and we might not be able to do it very accurately.    

    A different audience…

    There are a lot of people that write for a living – newspaper journalist, author, screenwriter, songwriter, technical writer, website content writer, etc. All of these people fundamentally do the same thing, but they write different content and for different audiences.

    Telling a developer what you want works the same way – which means you have to write for your audience. 

    It feels like it should be easy – but it isn’t. Developers generally have minds that work a bit differently – and so they should. It’s what allows them to do the great things that they do. It also means, that if you don’t tailor your content in a way that a developer understands, it’ll be a lot harder to end up with the product that you want.

    Different content…

    The final reason as to why it’s so hard to tell a developer what you want is that you’ve probably never have had to talk about this kind of stuff with anyone before! Building an app is likely a new experience, so you might not realise that there are some things that you were meant to tell your developer.

    For instance, did you know that you have to tell your developer your expectations for how many people will use the app? How quickly you think your platform will grow, etc.? What information do you want to collect in a form? What kinds of reports do you want? What fields should display on those reports? These are the kinds of things that you probably don’t think about when you’re defining your product.  

    Like any profession, developers come in different forms – some are purely coders and follow instructions to the “T”. This is where the level of detail in your content is very important. You can also get developers that are a bit more adaptable and will ask questions for clarification. However, you still need to give them enough content so they can understand what you’re trying to do. Remember, any time they have to clarify something, that’s time taken away from coding your app.

    Strategies…

    So, with all of these things working against you, how do you effectively tell a developer what you want?

    Learn the skill:

    Defining your product and what you want it to do is a skill. In apps and software development, it’s actually quite a specific and difficult one. There are people that get paid 6-figure salaries in large organization to do this. I know this, because I was one of them! So, how do you learn this skill without years and years of experience?

    First start by understanding what information you need to provide and how to structure it. You can look for some examples of how others have done this before (search for “good business requirement examples”). Model your own writing after these examples – and then keep going. Odds are the examples that you find are going to be high-level ones, so you need to dive a bit deeper to get the level of detail that you need for your app.        

    Know your audience:

    Developers are coding programs for a computer to interpret so start to think like a developer. How you describe your product to a developer is going to be very different to how you might describe your product to a potential customer, so adjust accordingly.  

    Start by being logical and systematic in what you write. Use “if this, then that” language to describe how someone will interact with the app and how decisions should be made. Write in bullet points and avoid long paragraphs. Draw diagrams to illustrate concepts. Find examples of existing apps that can illustrate what you want your app to do.

    Write it down:

    Basically, if you want your product to do something, then you’re going to have to document it for your developer. They can’t guess what you want – and if they did, chances are, it wouldn’t be the same as what you imagined. Think about your experience with an online tool or app – what happens normally? What happens when something goes wrong? If you want the field on a form to be a drop down, then you’re going to have to state that in your requirements.

    To make sure you have the right content, think about all of the processes required to make your product work. Think about all of the people that will use your app and how they will use it – I’m talking about all of the support functions that will be needed to run your app too. Also, spend some time thinking about the detail – use workflow diagrams to map your person’s journey and then consider, in detail, what happens at each step.

    Building an app for the first time is quite a feat. There is a LOT involved – and you have to tell that developer exactly what you want. It’s a very good bet that if you don’t, you’ll end up with something you didn’t want. That’s just human nature – we make assumptions based on what we know – but those assumptions may be different from someone else. So, if all else fails, write it down!

    Looking for a developer?
    Get my 10 essential tips for hiring the right developer for your project.
    Download it now for free!
    It can be done!

    If you haven’t guessed already, I’m pretty passionate about this kind of stuff. Web platforms and mobile apps get built all of the time, so people have found a way to get past these challenges! But how much time did it take and how much did they have to spend?!

    My aim though is to get you to the other side without wasting time and money having to clarify what you want or extending your project because there were things that you forgot to include. I hope my strategies will make it easier for you to tell a developer about what you want them to build.


    * When you sign up for a discovery session, we’ll also add you to our mailing list so you can receive emails from us (with your consent). These emails will include news and updates, occasional offers and promotions, and exclusive content and resources to help you on your development journey. You may also receive follow-up emails in relation to this session. We will not spam you. If you don’t wish to hear from us anymore, simply select the unsubscribe option at the bottom of any email that we send to you.To view our privacy policy, click here.

  • Tips for building a web platform or mobile app

    Tips for building a web platform or mobile app

    Curious about how to get your web platform or mobile app developed?  There’s a lot to figure out and sometimes it helps to get a few pointers on what to look out for.  So, in order to get you going in the right direction, I wanted to share with you some tips to help you successfully complete your app-building project and to set yourself up for running an app business.

    Building products and businesses are complex at the best of times – there are lots of moving parts, so you want to arm yourself with as much information as you can. These tips will give you a glimpse into the kinds of things that you’ll have to think about to get your app built and launched.

    Here are my 10 tips for building a web or mobile app:
    1. Validate, validate, validate:  How you do you know if your idea is “great”? Is this the idea that you should be building? You can save yourself lots of time and money by evaluating your idea and deciding whether it should be built in the first place.  See last’s week’s article on ways you can start to validate your idea.
    2. Learn how software development works: If creating a web or mobile app is new for you, then you need to learn more about how they get built. There’s actually a process for doing this – called the software development lifecycle. You should find out, at a high- level, what activities and outputs are involved in this process. This will make it easier to communicate with your developers and you’ll know what you need to do and what happens next.
    3. Start small: Think of the most bare bones version of your product and build that first. You want to make sure that your product really solves your customer’s needs, wants or goals. Starting small means that you don’t spend lots of money when you don’t need to. You can get something tangible built in a shorter amount of time. You may not be able to launch this product, but it will give you something to build upon. It’s always easier to build on something that has already been built than trying to build everything upfront.
    4. Define your product in a way that a developer can understand: You may think your developer knows what you want them to build – think again. The brain of a developer is wired differently from yours – it’s what enables them to do what they do! Unfortunately, this means that you might end up with a product that doesn’t do what you want it to. Developers expect their instructions to come is a certain way, so you need to learn the best way to define your product.
    5. Focus on “what” you want to do rather than “how”: “What” describes the activities and features that your product will provide; the “how” is the design and technical solution that will deliver what you want your product to do. If you provide a “how” to your developer – that is what they will build – even though it may not be the best approach for your product. Once the “what” is nailed down, you can work with your developer to decide on “how”.
    6. Prioritise what you want to build: It can be easy to make everything a high priority – a “must have” for your big launch. The reality is that if you build everything you want, you’ll never launch. You should prioritise based on how much something helps you to achieve your goals and those of your customers and users.
    7. Find a great developer: This is one of the most important factors for a successful project. If you don’t find the right developer for your project, you face an uphill struggle to build your product. You need to find a developer that has as much interest in your product as you do. Check references and find opportunities to “test” them before you hire them. Building trust and a strong relationship with your developer is paramount.
    8. Carefully manage the scope of your project: Scope creep occurs when the size of a project increases after it has started due to improper management of changes for what you want to build. This causes the cost and schedule of your project to blow out. Track any changes that you want to make to the product and have a process in place to evaluate whether it’s really needed.    
    9. Be structured in your testing: Testing is about making sure that your product works as you expected. It’s pretty much guaranteed that it won’t – even with the best developer in the world. A new product is a complex thing and it will have problems. This means that you need to have a structured approach when you test your product.
    10. Plan for what happens after your initial product has been built: Before your product is launched, there are several things that you need to plan for including; getting a copy of your code, defining how changes to the “live” product are managed, backing up and recovering your product if something goes wrong, getting access to any admin passwords and setting up a process for managing issues. Building your product is just the beginning – there’ll be lots to do on an ongoing basis.
    Are you ready to turn your good idea into a great product?
    My idea to launch checklist is your plain-English guide to getting there.

    It’s available now for only $24.
    Any tips to share?

    There you have it. My ten tips for building a web or mobile app. Of course there are many more, but these should get you going if you’re starting from scratch. If you’ve done this before and you’ve got other tips that you’d like to share, please leave them in the comments below.


    * When you download a copy of our cheat sheet, we’ll also add you to our mailing list so you can receive emails from us (with your consent). These emails will include news and updates, occasional offers and promotions, and exclusive content and resources to help you on your development journey. You may also receive follow-up emails in relation to this download. We will not spam you. If you don’t wish to hear from us anymore, simply select the unsubscribe option at the bottom of any email that we send to you.To view our privacy policy, click here.

  • Intro to Product and Software Development and Product Management (part 2 – at the beginning)

    Intro to Product and Software Development and Product Management (part 2 – at the beginning)

    In my last post, I introduced you to the concepts of product management, product development and software development. In this post, I want to bring it all together and explain what it means to a non-technical person starting on their app development journey. This all might seem a little daunting, so for now, here’s what you need to know:

    Product Development

    “Ideation” and “Analyse” are the most important parts of product development. In these phases, you need to be able to come up with an idea and see if it’s worth building:

    There are lots of different ways to come up with ideas for an app – but most usually come from personal experience – either at work or outside of work. Look for problems in your day-to-day life that might need solving.  Maybe it’s something in your industry or something in your job role.  Maybe it’s something at home, while travelling, parenting – the possibilities are endless!  

    After you have an idea, you want to make sure it’s the right one to pursue.  What makes you the right person to build this app?  Where might you need help? How big is the market? What’s the competitions like? There are lots of ways to evaluate your idea.  If you don’t validate your idea, then the rest of the process is really irrelevant. Validating an idea is about making sure you don’t want to waste your time and money on building an app that doesn’t allow you to achieve your goals.

    The product development process has natural “gates” that give you permission to stop what you’re doing and to go onto the next idea. If you don’t think your idea is good enough, keep repeating the “Ideation” phase until you have an idea that is more desirable. In the “Analyse” phase, if the idea doesn’t pass your validation criteria, you go back to the “Ideation” phase.

    Click Here
    To learn more about idea validation

    If you’ve decided to go ahead with developing your idea, you’ll then need to “Define” your product. This is about writing down what you want your product to do. This is an important process because it dictates how your product will end up!  Spend some time here really understanding the processes that people will go through, what you want them to do, what they’ll want to do and what information needs to be captured and stored. Also, consider all of the processes that might be involved in running your app – for example, how will people contact you if there is an issue? How will you respond to them? etc.

    Software Development

    The “Requirements” phase of software development overlaps with the “Define” phase of product development, so your defined product also forms the basis for the Requirements phase. The Requirements phase in software development will focus on the actual app being built; whereas the Define phase will look at everything that’s need to deliver and run the product.

    This phase is about telling people about what you want build – which makes it pretty important! If you can’t articulate what your product should do, then you might end up with something that is vastly different from what you expect. You’ll then spend a lot of time and money trying to make it right.

    Developers use the information that you provide about your product to estimate the cost of building it. This means that you want to be very clear about what you want your app to do. A lot of projects end up costing more money and take more time to complete because new things come up later in the project.

    Product Management

    Your product hasn’t been built yet, so the elements of managing the product through its lifecycle don’t come into play yet. However, you’ll want to start thinking about who your first users will be as you enter the next stages of building your product.

    What happens next?

    After you’ve figured out what your product needs to do, it’s time for you to start building. In our next article, we’ll look at getting your app designed and built.